When working on music, I often prefer using simple tools. Things that are focused on doing one thing really well.
This is something I’ve only started to learn and understand better in the past couple of years.
These days we have a lot of magnificently complex tools. Tools that sounds great and offer endless options and possibilities. They often look very attractive on the surface. Because with all those features they will do so much more for us, right?
Tools like that are usually not my first choice when making music.
Why?
First, because I am easily distracted. Using simple tools helps me stay on track and focus on the task at hand.
Second, complex tools tend to take more time to handle and manage. If I’m using a lot of tools like that, it adds up.
I design and develop my music making process with intention — asking myself questions like: What kind of workflow are my choices contributing towards? Am I making things easier or harder? Am I building momentum and consistency?
I don’t think everything can or should be dumbed down. It’s about choosing the methods and tools that are right for each moment.
I often draw for more complex tools for things like problem solving or mastering.
But option overload is real. It’s clearly one of the biggest problems of our time.
When making music I want to tap into the flow state. That allows me to move forward fast. Maintaining the momentum is very important.
The more I can simplify my process, the better it gets.
The friendly people at Baby Audio sent me their new creative reverb plugin Crystalline to check out and review before the release (which is today, April the 5th, 2022). Here are my thoughts.
Disclaimer:
I only ever write about products I like. You should be aware that I’m affiliated with Baby Audio and they have sent Crystalline for me for free before the release to check out.
What is Baby Audio Crystalline?
Baby Audio Crystalline is a forward-thinking, modern sounding algorithmic reverb plugin. Baby Audio say it’s “meant to sound unreal in the most positive sense of the word”.
It’s designed to give you great control over shaping your reverb in creative ways and making it sit well in the mix. All while maintaining ease of use and quick workflow.
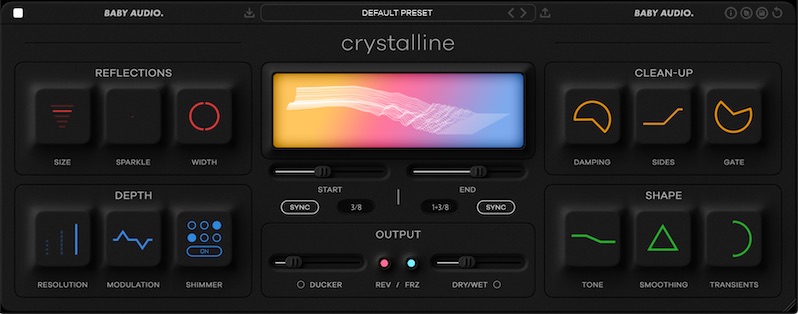
Baby Audio Crystalline in dark mode
Features in a nutshell
Besides features that are commonly found in reverbs, here are the highlights of Crystalline for me:
BPM-synced pre-delay and decay. This can result in a cleaner mix with the reflections being in sync. You can still switch off the sync, too.
Five different size algorithms. These are separate from the reverb decay so you can do interesting things like a small space with long decay or a large space with short tail.
The ability to shift the reverb’s emphasis between transient and sustain part of the incoming signal. This is huge for me. It allows to shift the sound of the reverb in a completely new way, and find the sweet spot where it sits in the mix best.
Width control. You can also mono the lows which I really appreciate.
Shimmer control which makes the high frequencies decay slower.
Gating for those classic nonlin Phil Collins vibes!
Reversing the reverb playback.
Freeze for out of this world sounds. Great for automating.
Baby Audio Crystalline Review -Video Walkthrough
Here is my in depth walkthrough video of Baby Audio Crystalline. The blog post continues below.
How does it sound?
Crystalline is not intended to mimic realistic spaces. Quite the opposite, it can get quite surreal and you can really shape the reverb to your liking.
It sounds smooth and pristine. It’s a modern sound, in line with modern classics like the Bricasti M7.
Even at the lowest resolution available (labelled “Basic”) it doesn’t get lo-fi or grungy at all.
Many reverbs excel either in small or larger spaces. But I have enjoyed creating both types of reverbs with Crystalline. It works well and feels very malleable in use.
Crystalline also invites experimentation. It often surprises me in a good way by leading me somewhere different than what I had in mind originally.
User interface and workflow
The interface in Crystalline is clean and fairly minimal. There is no menu diving. Everything is quick and easy to interact with.
The controls are grouped into four sections: Reflections, Clean-Up, Depth and Shape. A few further controls are placed in the middle section of the interface. This arrangement makes total sense to me and works well.
The interface is fully resizable. It’s done properly – meaning the text and everything else actually gets larger when you enlarge the plugin window. There are light and dark modes to choose from.
The controls that Baby Audio have decided to go for are all very useful and contribute to the shaping of the reverb sound in a meaningful way.
All of this leads to a smooth and effortless experience. Using Crystalline feels like shaping and moulding a sound out of wax until you have it just right.
How I like to use it
I reach for Crystalline when I want that lush modern vibe. It’s great for quickly getting a reverb going on something without dropping out of my creative flow.
Many reverbs out there are fiddly to use, with tons of options and features to choose from. I feel Crystalline has been specifically designed to counter those types of plugins. It is very quick to try different things with it and get good results.
There is no option overload here and I really like that.
Feature requests
I like Crystalline as it is and I don’t think there are any glaring problems with it. But as with most plugins I try, I do have a few thoughts on what I might like to see in future versions.
Parameter modulation
I love automating controls like Sparkle and Transient for instance to create evolving sounds. I’d love to have some simple modulation options for the different parameters in Crystalline. Perhaps something akin to Output Arcade – simple LFO’s and step modulators with randomness built in?
Option for dirtier reverb sounds.
I like how Crystalline sounds and it works well in the mix. But I would not mind having the option to go for something a little bit grittier also. How about a bit crusher integrated in the algo?
Longer decay
The max decay of 10 seconds leaves me wanting for more! It can still get quite outer spacey. Especially with the shimmer turned up to the max, which extends the tails of the higher frequencies. And yes, there is the freeze function. But it still leaves me wishing for longer tails in certain situations.
Output volume adjustment
Crystalline seems to be balancing the output volume automatically. It does a fair job in that it doesn’t make things louder. If anything, I feel it sometimes makes the output of the track quieter. I would like to have an option to adjust the output volume manually.
Confusing reverse and freeze indicators
This is minor, but the indicator lights for reverse and freeze push buttons are always on. It often misleads me. Why not just switch off the lights when the functions are off?
A/B slots
Because it’s so quick and malleable, Crystalline invites you to experiment and try different sounds. Working with it I often get alternative ideas that I’d like to try. It would be nice to have some quick slots to switch between a few different settings to see what work best.
I’m using Cubase where A/B functionality is built in to the plugin wrapper. But a lot of DAW’s don’t have that.
Trial and copy protection
Baby Audio plugins run in free trial mode until activated. They will output 5 seconds of silence every 60 seconds. Other than that, they work exactly like the paid versions.
The plugins are activated by entering the serial key that is emailed to you after purchase. You’ll need an internet connection to activate the license. You won’t need to be connected to use the plugins once they’re activated.
Supported platforms
Plugin formats: VST, VST3, AU, AAX. Platforms supported: Mac OS 10.7 and up including Catalina, Big Sur and Native Mac M1 compatibility. PC Windows 7 and up. DAWs supported: Ableton Live, Pro Tools, Logic Pro, FL Studio, Cubase, Nuendo, Reaper, Reason and any other major DAW software on the market.
Baby Audio Crystalline alternatives
It’s a reverb – there’s a ton of competition out there. I feel what makes Crystalline special is the creative shaping options.
Therefore, an alternative that springs to mind is the Waves H-Verb. It is more complex to use but has some of the same features such as BPM-synced pre-delay, ducking and many other options for shaping the reverb very creatively.
Is Baby Audio Crystalline worth it?
Baby Audio Crystalline is on intro offer for $49. After that the regular price will be $99.
I am of the opinion that if you need something, it costs what it costs. If you don’t need it, it won’t be worth it to you at any price (not even for free).
Think about how Crystalline would fit in your workflow. Try out the demo properly and make your judgements based on that.
Baby Audio Crystalline review – Conclusion
Crystalline is a well executed creative reverb plugin. It sounds really lush.
It many offers innovative ways to shape the reverb. The possibility to drive the reverb engine based either or transient or sustain part of the signal is a great example of that and works really well.
All of the shaping options Crystalline offers are functional and meaningful. The plugin is a joy to use and sounds good.
I’ve really enjoyed using it and I’m sure it will find a place in many of my productions going forward.
One of my Patreons asked me a great question today (thanks, Nick): What are the main differences between clipping and limiting?
There is a quick answer to this. And then there is more. It is a rather complex topic. So I decided to write a blog post in order to open up my perspectives a little bit more.
This is not a technical guide to clipping and distortion. I’m not qualified to write that, and I don’t think that would be very useful for the majority of the people reading this blog. This is just my attempt to boil the question of clipping vs limiting down into practical information. To share with you what I’m doing right now. If you have any further thoughts, feel free to drop your comments.
Clipping vs Limiting: The Quick Answer
Both clippers and limiters aim to stop (or sometimes reduce) peaks above threshold. But they use very different methods to achieve this goal. Clippers stop peaks by distorting them. By contrast, limiters try to do everything they can to avoid distortion. Both methods have advantages and disadvantages.
Clippers can retain the punch and integrity of the material better up to a certain point. Clipping can also be used creatively to enhance the impact and harmonic nature of the music. After a certain threshold (which varies greatly depending on the material and the clipper), clipping begins to sound nasty as a larger part of the material begins to get distorted.
Limiters are very good at getting more loudness out of the material without audibly distorting it. They apply many different methods to reduce and mask distortion. As a side effect, they can take away some punch and alter the spectral balance and stereo image of the material. Bass takes up a lot of energy, so it often gets traded for loudness.
In many styles of music today it’s common to combine clipping with limiting. This can give you the best of both worlds. Instead of limiting 5 dB, you could first clip 3 dB and then limit 2 dB. Or you could clip a little bit on the individual tracks or buses and just use a limiter on the master bus. Combining clipping with limiting can give you the same level of loudness with more perceived punch and transparency, as opposed to using a limiter alone.
That is my short answer on what are the differences between limiting and clipping. Now let’s look at some aspects of the topic in more detail.
Not All Clipping is the Same
Clipping is distortion. But not all clipping is the same. In the digital domain, it’s generally not a good idea to clip using a tool that is not designed to do that. It is better to use something that knows how to create the right kind distortion and how to deal with aliasing (a nasty side product of nonlinear processing).
Aliasing doesn’t happen in analog domain. That doesn’t mean clipping in analog will automatically sound good. But in that sense experimenting with it in analog domain is safer. Some mastering converters, for instance, are specifically designed so that you can clip them without adverse side effects.
Back to digital domain. Dedicated clipping plugins are designed to process audio and to clip in specific ways. They often apply techniques like oversampling to reduce undesired side effects such as aliasing.
There are big differences between different clipping plugins, too. Some aim to be transparent and some colour the sound in different ways. There are clippers that do hard clipping, others that do soft clipping and with some you can adjust the style.
Some clippers have low latency and CPU consumption, while others only care about maximising sound quality. There are single band and multi band clippers. There are plugins that combine clipping with saturation, compression or limiting.
Above all, each clipper plugin tends to sound different. It’s not apparent with small amounts of gain reduction, but the differences become very noticeable when pushing them harder.
As you can see, clippers are definitely not a unified bunch. Different tools for different situations. I always recommend to try different ones and see what works best for you.
A Few Words About Limiters
Limiters are essentially compressors with infinite ratio. Instead of distorting the peaks, they work by reducing the level of the peaks.
They also have some very clever tricks up their sleeves. For instance, they may apply a lookahead in order to predict the peaks. This introduces latency, but allows the limiter to react to peaks in more transparent way.
Limiters try to minimise audible distortion by preventing it as much as possible. And when distortion inevitably does occur, limiters attempt to mask it by using psychoacoustic models and other methods. Some limiters apply different processes to different parts of the signal under the hood. They can be quite complex beasts and like clippers, each one is different.
All this processing never comes without side effects. Depending on the material, the limiter in question and how hard you are hitting it, you may lose some punch or alter the spectral balance or the stereo image of the material.
Because I do mastering, I have different limiters in my toolbox for different occasions. Most people should be just fine with one good limiter (indeed even I stick with just one most of the time).
How I Use Clipping
I use clipping for different purposes. Don’t get me wrong though. I don’t always use clipping to achieve these things. I may also use limiting, compression, saturation or any combination of them and/or clipping. Never the less, here are my common use cases for clipping:
To transparently control the dynamic range on individual tracks or buses. Usually to shave off excessive peaks in order to help the dynamics processing further down the line. For this purpose I either clip in analog (Prism Sound Titan AD converter) or I use the SIR StandardCLIP plugin. StandardCLIP has good metering and nicely adjustable oversampling and other controls which makes it suitable to use on individual tracks.
To achieve harmonic effects. For example, clipping a snare drum or a drum break to give it some edge. For this I tend to clip in analog by driving my mixer (Midas Venice 320) hot and then finishing the clip with the AD converter. ITB, one could use a clipping plugin that can produce some nice character, like Kazrog KClip.
To achieve some loudness by clipping the master before final limiting. I often first clip the AD converter just slightly. I will then follow that with the Voxengo OVC-128 clipper. It first gives you some transparent gain but then begins to add some character which I really happen to like on my own music.
My Fav Plugins
If you want a more detailed lowdown on the tools I’m using, check out the new “Tools I Love” page. But here’s a quick list of what I’m currently using for clipping and limiting.
Clipping Plugins
These are currently the best clipping plugins for me.
Voxengo OVC-128 for the master on my own tracks. Sounds great and the processing is of great quality. I like the character it introduces for my music.
SIR StandardCLIP for individual tracks/buses or transparent mastering tasks. Good metering and very adjustable for different situations. Can also get pretty grungy if you like.
Kazrog Kclip for character on individual tracks/buses.
Limiter Plugins
These are currently the best limiter plugins for me.
DMG Audio Limitless is my main limiter. It also includes a great clipper. It’s a very deep plugin and requires some dedication to get the best out of it. Even after a year I am still learning.
iZotope Ozone Maximiser is a great fit for most people. Sounds great even when pushed and not difficult to set up.
Voxengo Elephant is a transparent and open limiter that also goes pretty loud. Lots of options if you want to tweak. If you are going for a big and open sound, try this.
Eventide Elevate for punchy loudness. The tradeoff is it can change the character of the material. Also includes a clipper and a multiband transient section.
Because you are probably thinking about why it isn’t mentioned, let’s talk about FabFilter Pro-L2. I have used it a lot in the past. It’s a good plugin. But the competition is fierce. For what I’m doing, I more often than not get better results with one of the other limiters I’ve mentioned. The differences are probably insignificant for most people. But in mastering work every little bit matters. Then again, I’m sure there are mastering engineers who prefer the Pro-L2. So just do your own testing before making any buying decisions.
Conclusion
Clipping and limiting can be useful, but very destructive tools – especially on the master bus. Be very careful with them. It’s easy to set something up and then accidentally drive it too hot later on. Keep a close eye on the metering so that you always know how hard you are hitting something.
If someone else is doing the mastering, it’s best to leave final clipping/limiting to them. They can likely try different tools to find what works best with the material. Above all, they have the ears, experience and the playback system to evaluate it neutrally.
This shouldn’t stop you from experimenting and learning though. It’s worth exploring how different clipper and limiter plugins react with your material and how you may want to use them.
How to clean up my Mac? It’s a question most of us Mac users run into eventually. Without proper maintenance, all computers get clogged up sooner or later. In this guide I’ll show you easy steps you can take to clean up a Mac and make it run better. There is a lot you can do to improve your Mac’s performance.
A lot of audio plugin companies base their business around big discount campaigns. You can get things for really cheap sometimes but before you go on a buying rampage, I wanted to share with you how I make buying decisions when it comes to plugins and audio tools.